
Please read instructions thoroughly before attempting fabrication of the Neil and Parks Wheelie Bar Kit. These are general instructions, so sizes and/or quantities may be different.
Tools Needed:
- Electric or Air Drill at least 1/4" chuck
- 1/4" drill bit for the adjustable height pin hole
- Curved jaw Vise grips
- 2- 7/16" wrenches
- 2- 1/2" wrenches
- 2- 9/16" wrenches
- 12' min tape measure
- Hacksaw or steel cutting bandsaw
- Tig Welder and competent operator
- Hammer
- 3/8-24 tap with cutting oil
Parts List:
- Qty 1 - Wheelie bar wheel assembly (large tube, side plates, wheel, bolts, heims, and rod end adapters)
- Qty 2 - Medium sized tubing, same length, probably about 60" long
- Qty 1 - Large tubing, probably 60" long
- Qty 1 - Small tubing, probably 24-36" long
- Qty 3 - Large clevises and tabs, with fasteners
- Qty 4 - Small clevises and tabs, with fasteners
- Qty 1 - Medium tubing 3-9" long for bushing large clevis up to size of large tubing (may or may not be included)
- Qty 1 - 1/4 x 1 1/2" bolt, nut, washers
Instructions:
- Determine the location for the mounting tabs and the desired overall length.Think about parachute lines, overflow tanks, functionality of the wheelie bar itself, and other concerns.
- Weld a large clevis in one end of the large tube. Do not cut to length at this time.
- While the large tube is cooling, cut the two medium sized tubes to length if necessary. Weld a rod end adapter in one end and a large clevis in the other end of both tubes. These two should be the same length +/- 1/16".
- Weld a large tab in the lower mounting position on the car at this time. Try to place it where it will not interfere with your jack location. Dummy bolt the large tube on at this time and slide the wheel assembly on at this time.
- Run a tap through the rod end adapters at this time. They will probably have cooled by now so you can tap them with cutting oil.
- Screw the medium sized tubes onto the heims at this point. Leave the heim screwed out 1/4-3/8" for adjustment. Now dummy bolt the large tabs into the clevises of the medium tubes at this time and weld onto the chassis on the decided location. The farther you can spread the upper and lower tubes of the wheelie bar, the stronger the wheelie bar will be; the shorter this distance, the more flexible. Now, if the lower bar is too long at this time to place the wheelie bar at the lowest possible running height, cut it off so it will go there now.
- Place the wheelie bar at the average running height and vise grip where the lower tube slides into the wheel assembly to hold the height and make sure the wheel is straight up and down at this time.
- CENTERING It is extremely important to follow these instructions. The car will go straight if you if you implement this process correctly; it will not go straight if you do not. Use your tape measure to measure from the centerline of the wheelie wheel axle to a housing end, brake rotor, or axle flange. Screw the heims in or out until you get an even reading on both the left and right sides. DO NOT measure to the rear end housing. It needs to be something that is concentric with the axle.
- Use the small tubing and the small clevises to place a semi-vertical brace somewhere near the center of the wheelie bar on both sides. Perfectly straight up and down will work just fine, but I recommend slanting it back somewhat because I don't care who you are, when you are finished, if you put it perfectly vertical, it will look crooked one way or the other, or both. I also recommend getting an approximate length of these bars and welding the clevises, lined up with one another, on the bench. It is a lot easier to fumble with one part than three when tacking onto the wheelie bar.
- Finish welding the small tabs at this time and whatever else you may have forgotten.
- Drill a 1/4" hole through the wheelie wheel assembly and the large tube at this time at the desired height locations. A good starting point is 3" ground clearance with driver in car, and tires at proper inflation. Drill this hole horizontally. If you drill it vertically, the bolt will drag and snag various things at various times in various locations.
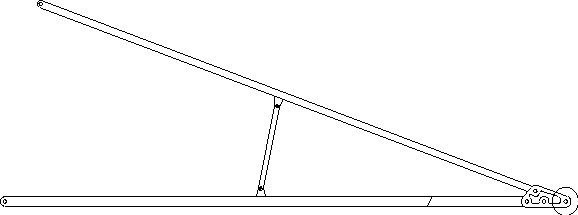
This is a rough sketch of what it should end up looking like. If you have any questions please call 785-422-8722.