
Please read instructions thoroughly before attempting fabrication of the Neil and Parks Wing Kits. These instructions cover both bracket mounted and canard style wings. Bracket mounted only in red, Canard mounted only in blue, instructions for both in black. Tips/Options in Green.
Tools Needed
- 1/8", 3/16", 1/4" drill bits
- Unibit, or way to make a 7/16" - 1/2" hole in the skin
- At least a 3/8" chuck drill motor
- Tape Measure
- Pencil
- Tin Snips (Right, Left, and Straight)
- Flat File to smooth cuts for brackets
- Sandpaper
- Soft Faced Hammer & Dolly
- 1/8" Allen Wrench
- 3/8" Wrench
- (2) 7/16 Wrenches
- Steel or Aluminum cutting Bandsaw or Hacksaw
- Clecos and Cleco Pliers-- If not available, extra rivets
- Many Small Vise Grips or a firm clamp, preferably with smooth jaws (Cleco Clamp)
- Tig Welder and competent operator
- Flat File or Angle grinder to buff welds down
- Combination Square
- Pop Rivet Gun for 1/8" Rivets
- 10-32 Tap and Handle
- FLAT Table to weld wing frame on
- Dividers (optional)
Parts List
- Wing Spars, could be anywhere from 2 to 7 pieces depending on kit
- Pre-bent Skin
- Trailing Edge
- Aluminum or Steel Tubing
- Mounting Brackets
- Bolts, Nuts, and Washers
- Rivets
- Endpanels/Material for Endpanels
- Screws for Endpanels
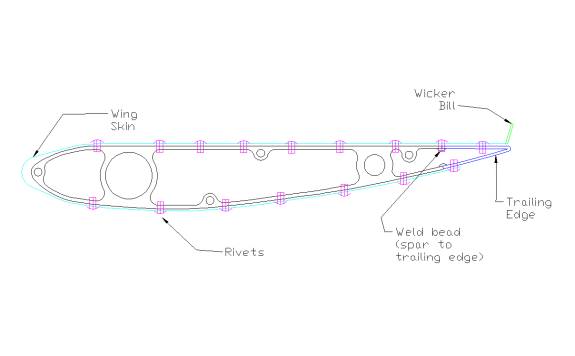
- Wicker Bill
Frame Assembly Procedure
- Determine exactly how wide you want your wing and what mounting centers it needs to have or what length of tubing it needs hanging out to mount it with. Cut the trailing edge to the total length of wing, and the tubing as well.
Cut the aluminum tubing 3/4" shorter than the total length for canards. If you are making canards that fit adjacent to the nosepiece contour, shorten the aluminum tube enough to give you ample wing skin material to trim to the nose contour (typically 2" is plenty). - Cut the trailing edge of the spars off at the point at which the trailing edge blends into the rear of the spar well. What you want is the trailing edge to be shaped just like the complete spar is, as close as possible.

- Slide the steel tubing inside of the aluminum tubing and protrude one side 1/4". Drill two 1/4" holes through both pieces in a parallel manner and bolt together with 1/4" bolts. This anchors the steel tubing inside the wing.
- Attach the mounting brackets to the center spars and determine the position they need to be on the tubing to get your required mounting center distance.
- Slide all remaining spars on the tubing, position appropriately, (outer spars with pockets outward) and lay the assembly upside down on your flat table. Position the trailing edge next to the spars and weld the spars to the tubing, and the trailing edge to the spars.
Some wings will just rivet the spars to the tubing and weld to the spar only.
The weld on the trailing edge needs only to hold until you get the wing skinned, and then no weld is necessary at all.
It is really a help later to just tack the trailing edge on the inside after completely welded. Be sure all spars are square to the tubing and there is no twist in the frame as you weld. Turn the frame over and weld the top side. - Grind your welds flush so it does not protrude past the wing contour. On the bottom side, be careful not to scuff the trailing edge, as the skin will not cover completely.
- Perform a final check for squareness, straightness, parallelism, etc. as what you have now is what you will get.
Skinning Procedure
General look of finished product is:
- Wrap skin around spar next to mounting bracket. Line up the top edge of the skin with the back of trailing edge. Hold with multiple hands or clamp down to mark where your slots for the mounting bracket need to start and stop (front to back). Measure from each end where the slot needs to be located left to right and lay out on skin. Drill a 7/16 or 1/2" hole at the end of each slot. Connect the holes with the tin snips. This will look terrible at this point.
If you cut with the lefts for a 1/2", then the rights for a 1/2" until across the slot, this will help.
Use the dolly and soft hammer to remove dents from the tin snip cutting and flat file to finish the edge.
Be careful not to dent the top of skin while doing this.
Sandpaper is a good way to disguise the final little nicks if you are not painting the wing. Hold at about a 45 Degree angle to the slot and rub back and forth a few times. If there is a better way to cut these slots I wish I knew it!!!! Place the skin over the frame and double check that the slot is large enough. Sometimes they have to be significantly larger to slide over the bracket.
If you put a radius in the ends of the slots, the skin will crack from the ends of the slots at a much slower pace, if ever. - Wrap the skin over the frame. Line up the top edge of the skin with the back of the trailing edge. Clamp the top skin to outer spars as much as practical (3-4 on each side). Lay out a pattern across the trailing edge with one rivet at the locations of the spars across the wing and every 1 to 1 1/2" in between, 3/4" from the rear of wing.
You must be at least 3/4" from the rear of wing or the rivet will be too long to fit in the hole.
Start drilling 1/8" holes across the back on the top side at your marked locations, starting in the center and working outward. Place Clecos in your drilled holes periodically.
Don't push through the trailing edge too hard or you will dent the underside and it will show when you are done. - Lay out a hole pattern going down each spar on the top side every 1 to 1 1/2" wherever it will fit dodging the screws that hold the end panel on. Drill 1/8" holes from the center moving outward, then from the rear going forward. Work across the entire wing before moving to the next forward hole.
The skin may look perfectly flat, but it is wrinkled, bent, and otherwise not perfect.
By working from the back to front, you will push the wrinkle to the front, where it will be hidden in the leading edge radius. - If using a wicker bill, un-Cleco the back edge, then slide the wicker bill under the skin, and drill through all the holes.Re-Cleco down.
- Turn wing over. If you used a lot of Clecos (about 1/3 of the holes or more) it will sit on the Clecos and be just fine. Push the skin down to meet the trailing edge and clamp the ends. Pull the rear edge of the skin forward or backward to move the leading edge up or down if necessary to have a better contour. Lay out a pattern across the back just like you did on the top, only now you can go as close to the edge as you want because the wing is plenty thick enough in this area for the rivets to fit into.
- Drill 1/8" holes at your marked locations, starting in the center and working outward. Cleco periodically. Lay out a hole pattern going down each spar on the bottom side every 1 to 1 1/2" wherever it will fit dodging the screws that hold the end panel on. Drill 1/8" holes from the center moving outward, then from the rear going forward.
- Remove all Clecos from the wing and deburr the holes in the skin and on the frame. Place skin back on frame and start riveting together in the same sequence you drilled the holes.
- Doubler plates around mounting brackets. These are only necessary if your slots are ugly. You will need to use flat head rivets where the plate covers
existing rivets.Cut your doubler plate to the appropriate size and rivet on. You are now done with the skinning process.
- Endpanels. These are mostly for aesthetics as to construct for total efficiency is impractical. To work right, they need to drag the ground and reach to the sky. So, make them as large as you can stand to look at or work around, with some eye pleasing shape and call it good.
If you have any questions please call 785-422-8722.